
Securing the Kubernetes API server. Part 2

Securing the cluster with Role-Based Access Control (RBAC)
In Kubernetes version 1.8.0, the RBAC authorization plugin graduated to GA (General Availability) and is now enabled by default on many clusters. RBAC prevents unauthorized users from viewing or modifying the cluster state. The default Service-Account isn’t allowed to view cluster state, let alone modify it in any way, unless you grant it additional privileges. To write apps that communicate with the Kubernetes API server, you need to understand how to manage authorization through RBAC-specific resources. In addition to RBAC, Kubernetes also includes other authorization plugins, such as the Attribute-based access control (ABAC) plugin, a Web-Hook plugin and custom plugin implementations. RBAC is the standard, though.
Introducing the RBAC authorization plugin
The Kubernetes API server can be configured to use an authorization plugin to check whether an action is allowed to be performed by the user requesting the action. Because the API server exposes a REST interface, users perform actions by sending HTTP requests to the server. Users authenticate themselves by including credentials in the request (an authentication token, username and password, or a client certificate).
Understanding Actions
As you know, REST clients send GET, POST, PUT, DELETE, and other types of HTTP requests to specific URL paths, which represent specific REST resources. In Kubernetes, those resources are Pods, Services, Secrets, and so on.
Here are a few examples of actions in Kubernetes:
- Get Pods
- Create Services
- Update Secrets
- And more
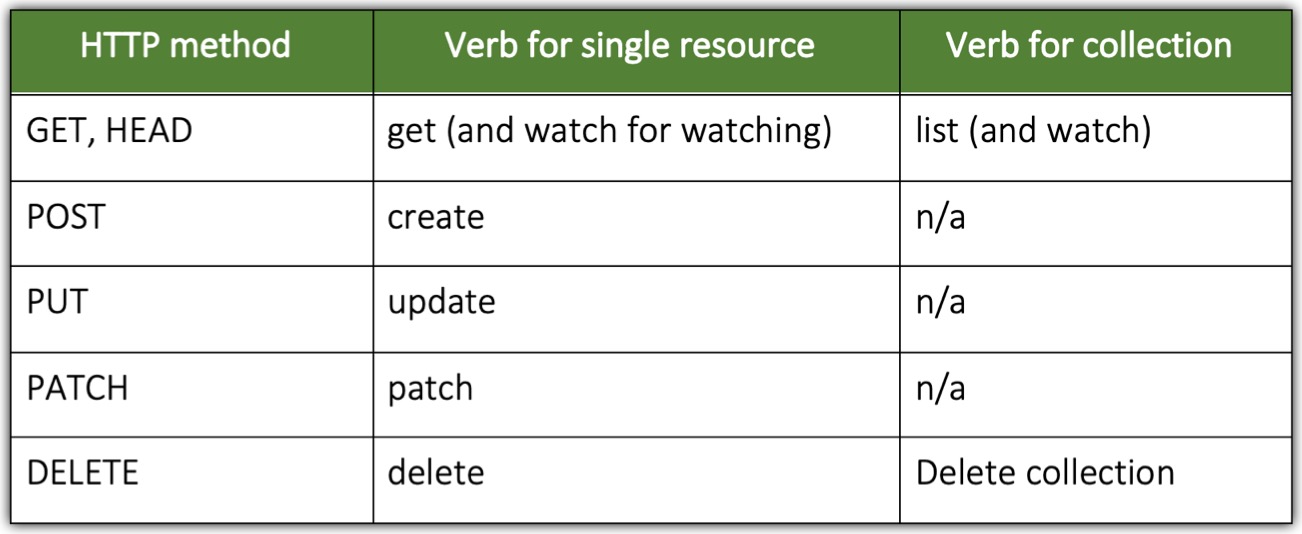
The verbs in those examples (get, create, update) map to HTTP methods (GET, POST, PUT) performed by the client (the complete mapping is shown in the table below). The nouns (Pods, Service, Secrets) obviously map to Kubernetes resources.
An authorization plugin such as RBAC, which runs inside the API server, determines whether a client is allowed to perform the requested verb on the requested resource or not.
Besides applying security permissions to whole resource types, RBAC rules can also apply to specific instances of a resource (for example, a Service called myservice).
And later you’ll see that permissions can also apply to non-resource URL paths, because not every path the API server exposes maps to a resource (such as the /api path itself or the server health information at /healthz).
Understanding the RBAC Plugin
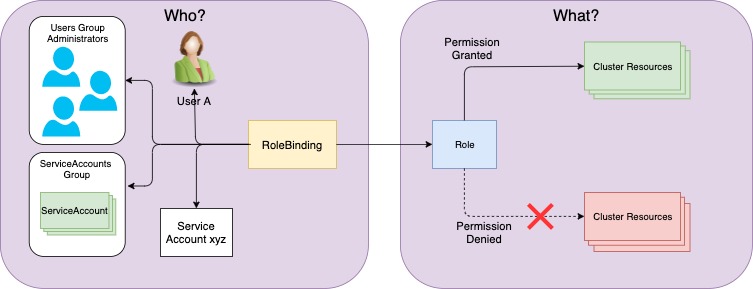
The RBAC authorization plugin, as the name suggests, uses user roles as the key factor in determining whether the user may perform the action or not. A subject (which may be a human, a ServiceAccount, or a group of users or ServiceAccounts) is associated with one or more roles and each role is allowed to perform certain verbs on certain resources.
If a user has multiple roles, they may do anything that any of their roles allows them to do. If none of the user’s roles contains a permission to, for example, update Secrets, the API server will prevent the user from performing PUT or PATCH requests on Secrets.
Managing authorization through the RBAC plugin is simple. It’s all done by creating four RBAC-specific Kubernetes resources, which we’ll look at next.
Introducing RBAC resources
The RBAC authorization rules are configured through four resources, which can be grouped into two groups:
- Roles and ClusterRoles, which specify which verbs can be performed on which resources.
- RoleBindings and ClusterRoleBindings, which bind the above roles to specific users, groups, or ServiceAccounts.
Roles define what can be done, while bindings define who can do it.
Role and RoleBinding are namespaced resources, whereas ClusterRole and ClusterRoleBinding are cluster-level resources (not namespaced).
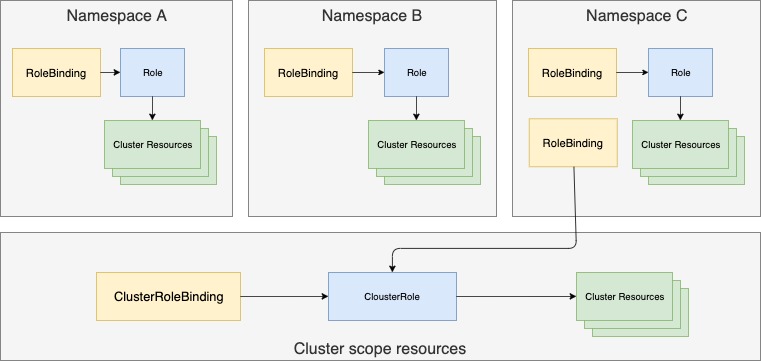
As you can see from the figure, multiple RoleBindings can exist in a single namespace (this is also true for Roles). Likewise, multiple ClusterRoleBindings and Cluster-Roles can be created. Another thing shown in the figure is that although RoleBindings are namespaced, they can also reference ClusterRoles, which aren’t.
The best way to learn about these four resources and what their effects are is by trying them out in a hands-on exercise. We will do that now.
Using Roles and RoleBindings
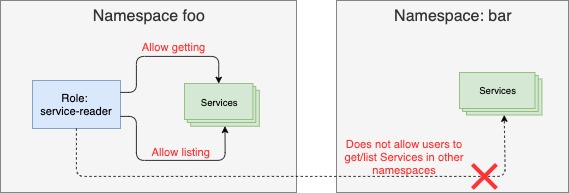
A Role resource defines what actions can be taken on which resources (or, as explained earlier, which types of HTTP requests can be performed on which RESTful resources). The following listing defines a Role, which allows users to get and list Services in the foo namespace.
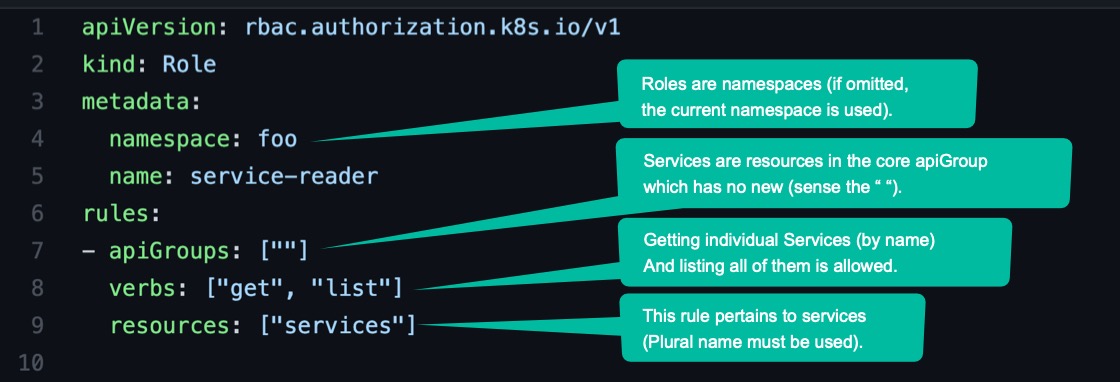
Notice that the plural form must be used when specifying resources.
This Role resource will be created in the foo namespace. We know that in Kubernetes each resource type belongs to an API group, which you specify in the apiVersion field (along with the version) in the resource’s manifest. In a Role definition, you need to specify the apiGroup for the resources listed in each rule included in the definition. If you’re allowing access to resources belonging to different API groups, you use multiple rules.
Note that in the example, you’re allowing access to all Service resources, but you could also limit access only to specific Service instances by specifying their names through an additional resourceNames field.
The figure below shows the Role, its verbs and resources, and the namespace it will be created in.
Creating a Role
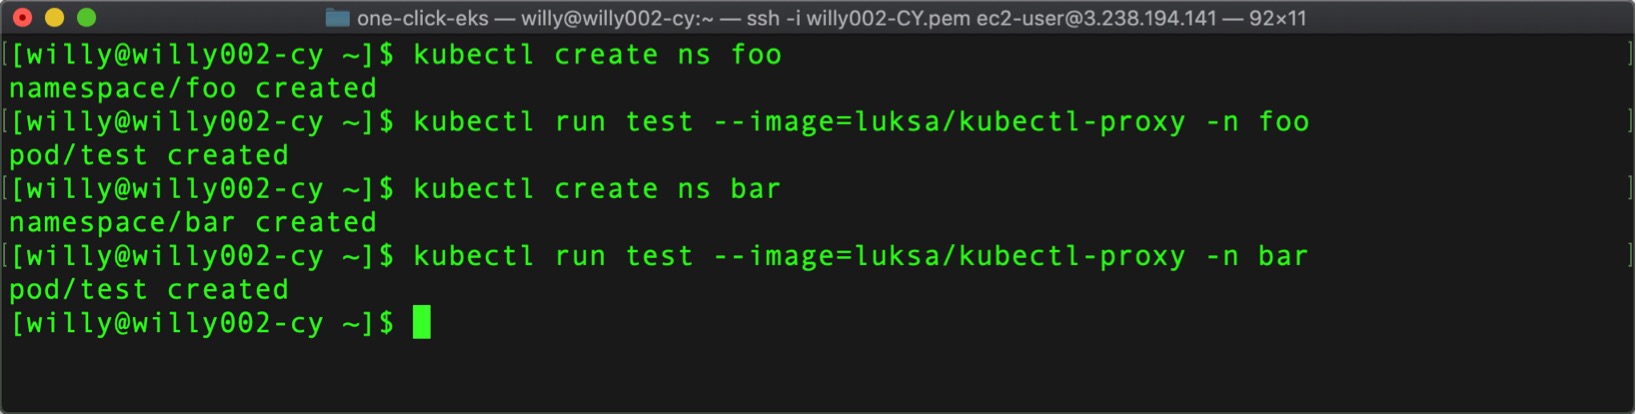
First we will create two ServiceAccounts, foo and bar and we will spin out two different pods using both accounts:
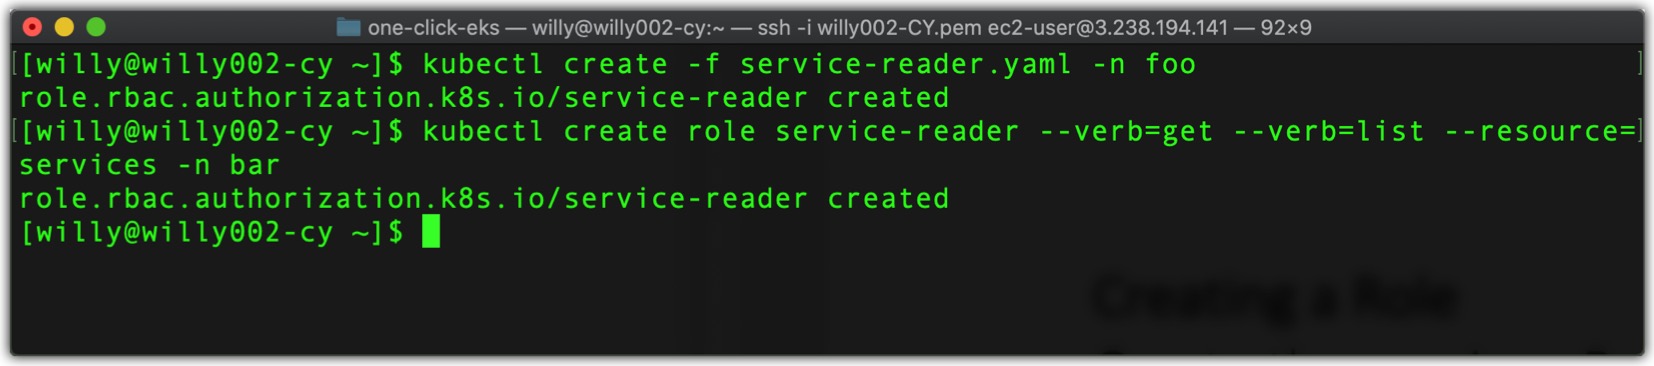
Now, we create the previous Role in the foo namespace using the command:$ kubectl create -f service-reader.yaml -n foo
Note that the -n option is shorthand for --namespace.
Instead of creating the service-reader Role from a YAML file, we could also create it with the special kubectl create role command. Let’s use this method to create the Role in the bar namespace using the command below:$ kubectl create role service-reader --verb=get --verb=list --resource=services -n bar
These two Roles will allow us to list Services in the foo and bar namespaces from within the two pods (running in the foo and bar namespace, respectively). But creating the two Roles isn’t enough. You need to bind each of the Roles to the ServiceAccounts in their respective namespaces.
Binding a Role to a ServiceAccount
A Role defines what actions can be performed, but it doesn’t specify who can perform them. To do that, you must bind the Role to a subject, which can be a user, a ServiceAccount, or a group (of users or ServiceAccounts).
Binding Roles to subjects is achieved by creating a RoleBinding resource. To bind the Role to the default ServiceAccount, run the following command:$ kubectl create rolebinding test --role=service-reader --serviceaccount=foo:default -n foo

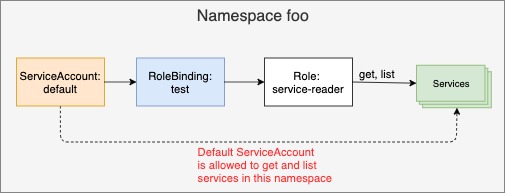
The command should be self-explanatory. You’re creating a RoleBinding, which binds the service-reader Role to the default ServiceAccount in namespace foo. You’re creating the RoleBinding in namespace foo. The RoleBinding and the referenced ServiceAccount and Role are shown in the figure below.
Note that to bind a Role to a user instead of a ServiceAccount, use the –user argument to specify the username. To bind it to a group, use --group.
The following listing shows the YAML of the RoleBinding we created.
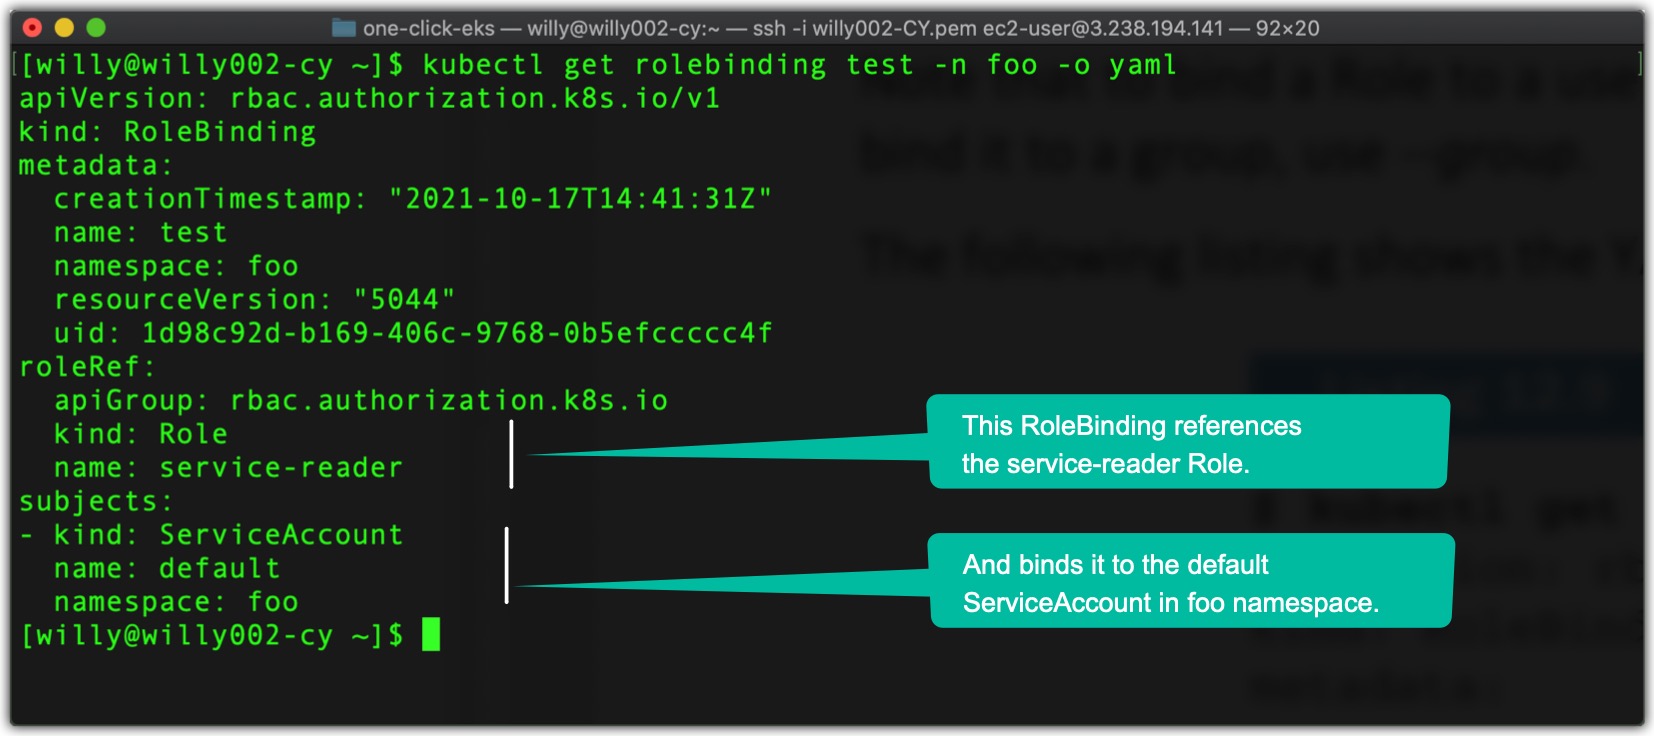
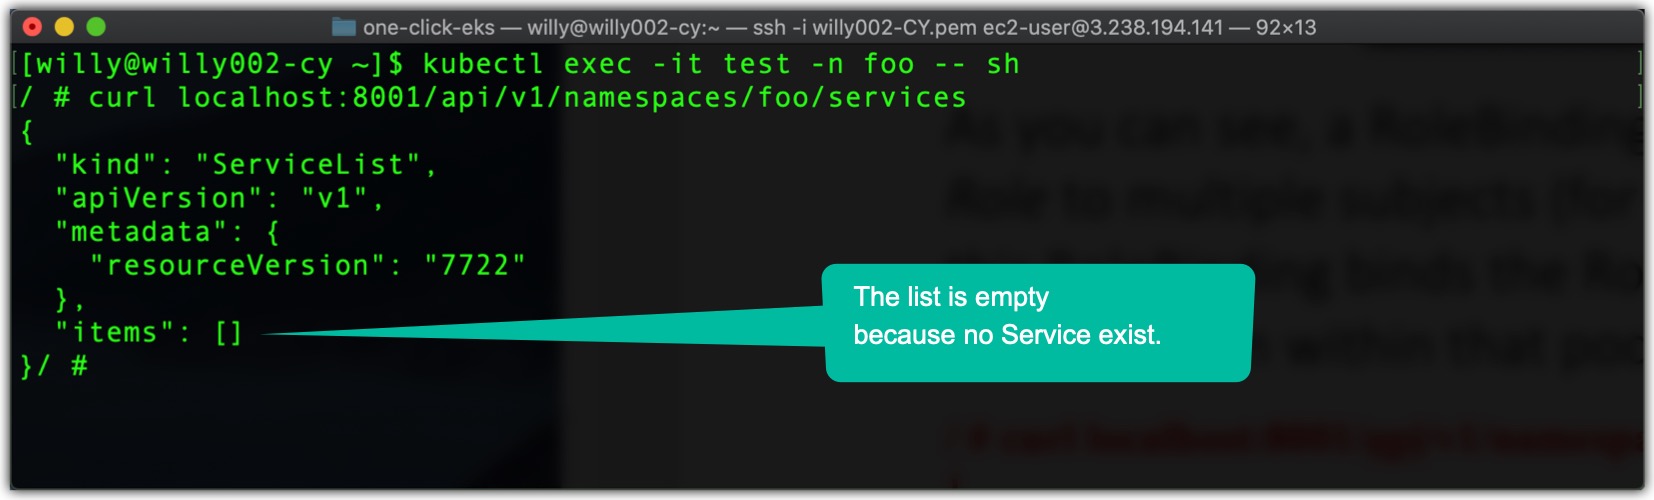
As you can see, a RoleBinding always references a single Role (as evident from the roleRef property) but can bind the Role to multiple subjects (for example, one or more ServiceAccounts and any number of users or groups). Because this RoleBinding binds the Role to the ServiceAccount the pod in namespace foo is running under, we can now get inside the container in the pod test in the namespace foo using the exec command and from there call the server api using the curl command and list Services as shown below.
Including ServiceAccounts from Other Namespaces in a Rolebinding
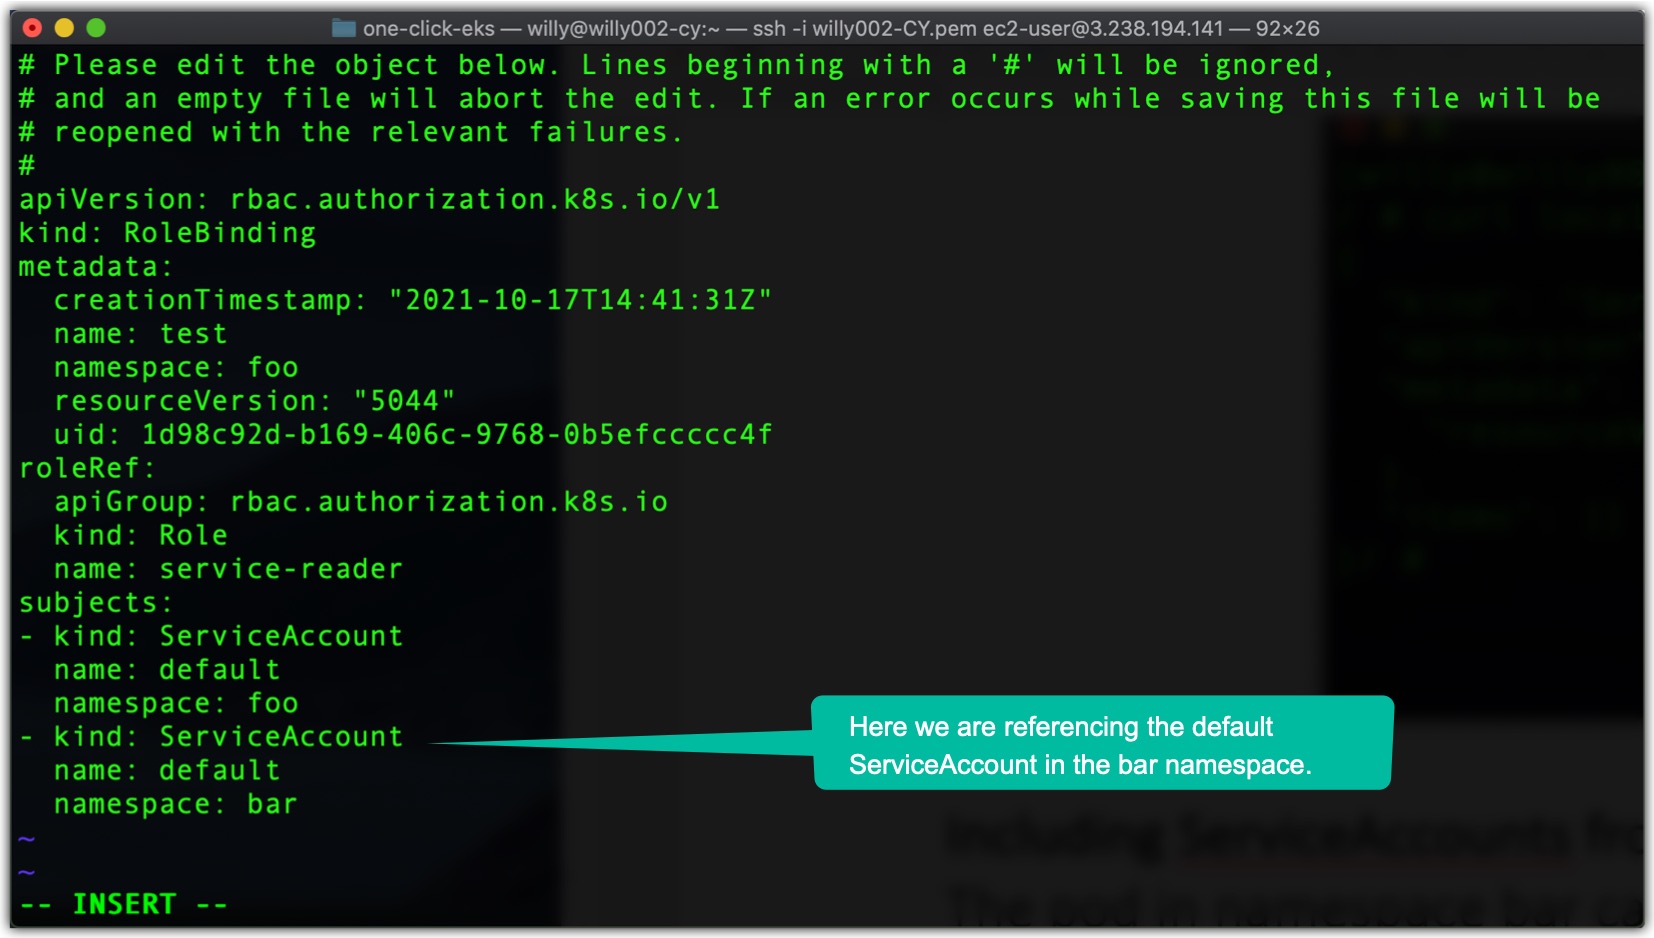
The pod in namespace bar can’t list the Services in its own namespace, and obviously also not those in the foo namespace. But you can edit your RoleBinding in the foo namespace and add the other pod’s ServiceAccount, even though it’s in a different namespace. Run the following command:$ kubectl edit rolebinding test -n foo
Then add the following lines to the list of subjectssubjects:
- kind: ServiceAccount
name: default
namespace: bar
as shown in the following listing
Now we can also list Services in the foo namespace from inside the pod running in the bar namespace by running the same “curl” command as before but from the pod in bar namespace (kubectl exec -it test -n bar – sh).
Before moving on to ClusterRoles and ClusterRoleBindings, let’s summarize what RBAC resources you currently have. You have a RoleBinding in namespace foo, which references the service-reader Role (also in the foo namespace) and binds the default ServiceAccounts in both the foo and the bar namespaces, as depicted in the figure below.

In the Part 3 we address using ClusterRoles and ClusterRoleBindings.
REFERENCES
Kubernetes Documentation. Kubernetes.io/docs
Marko Luksa. Kubernetes in Action. 2018 Edition